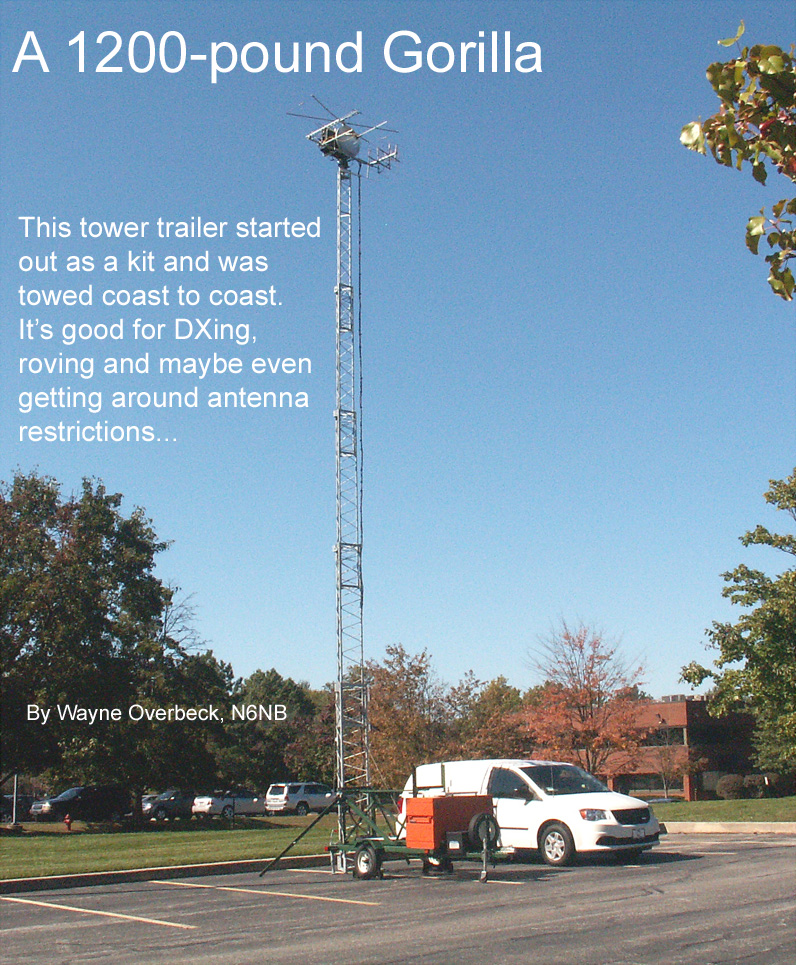
 An earlier version of this appeared in the Proceedings of the 2012 Northeast/Mid-Atlantic VHF Conference. One of the biggest challenges facing radio amateurs today is finding a way to put up a good antenna. According to recent filings with the Federal Communications Commission, about 62 million Americans live in deed-restricted communities. In many of those communities, most if not all outdoor antennas are prohibited. A few hams have found a solution: a tower trailer. As a licensed vehicle, a trailer is not subject to many land-use restrictions that would apply to a structure. Radio amateurs have been known to park a tower trailer on their property and put up antennas that would not be allowed if they were ground-mounted or attached to a building. Others simply tow a trailer to a hilltop to operate portable or "rove" in contests--away from neighbors' eyes. It's a great way to get antennas high enough to clear nearby buildings and trees. Hams have been building tower trailers and rebuilding surplus ones for years. Over the years, I have built 10 tower trailers for portable hamming. Several of those tower trailers are shown on various pages of this website. One of them had a 70-foot crankup tower that was so large some people called it "Godzilla on wheels" when it was described in CQ magazine (August, 1980). But a tower trailer of that size is difficult to tow and even harder to maneuver when it's not hitched to a vehicle. Such a trailer is also expensive to buy or build. Now there's an easier way to get an antenna up 40 or 50 feet on a trailer: build a low-cost utility trailer from a kit and expand it into a tower trailer. Major home improvement chains and tool importers offer utility trailer kits with payload ratings of nearly a ton at prices under $400.
SAFETY PRECAUTIONS Before going any further into a description of how this tower trailer was built, some safety precautions should be emphasized. Never raise a tower trailer like this one (or any other antenna, for that matter) without first making absolutely certain that there are no power lines anywhere nearby. Look around carefully for power lines that might be concealed in a tree or partially hidden by a building. Second, use common sense when setting up any tower trailer. Check the weather. Make sure high winds are NOT in the forecast. Don't assume a tower trailer won't tip over in windy weather. If winds of more than 15-20 miles per hour are possible, don't raise the tower. If you must raise it in windy weather, secure it to buildings or trees with guy ropes. Finally, when towing a tower trailer, drive at reasonable speeds and don't make sharp turns. Some trailer tire makers put a label on their tires warning against speeds above 55 miles per hour. When towed and used sensibly, a tower trailer
like this one is reliable and safe. In 2012, I towed this trailer
6,000 miles on an extended trip from Southern California to Cape Cod, Massachusetts.
The tower was raised about 30 times during that trip alone. It was
later raised and lowered 10 times (in 10 grid squares) during one VHF contest.
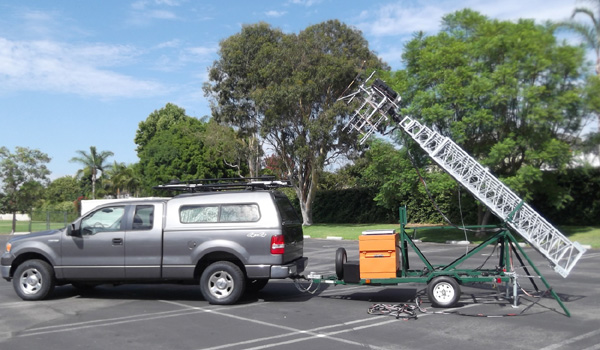
BUILDING THE TRAILER The starting point in building this trailer was purchasing a heavy-duty 4'x8' utility trailer kit at Harbor Freight (item #94564). The complete kit weighs about 200 pounds and can be built in a weekend. The finished trailer has a gross vehicle weight rating of 1980 pounds and a rated payload of 1720 pounds. Once the utility trailer was built, I added a steel structure to support and raise a tower that I had on hand, a U.S. Towers TMM-541SS. With a rotor on top, the antennas can be raised to about 45 feet, depending on the length of the mast. The entire unit weighs about 1200 pounds, including the original trailer, the tower and the superstructure to support it, a large orange job site box from Home Depot, antennas, a rotator, three electric winches, a 75 ampere hour gel cell battery to power the winches and a solar panel to recharge the battery. Getting the trailer licensed by the California Department of Motor Vehicles was not difficult. A DMV employee looked at the trailer, inspected the certificate of origin provided by the trailer kit manufacturer, and issued a license plate.
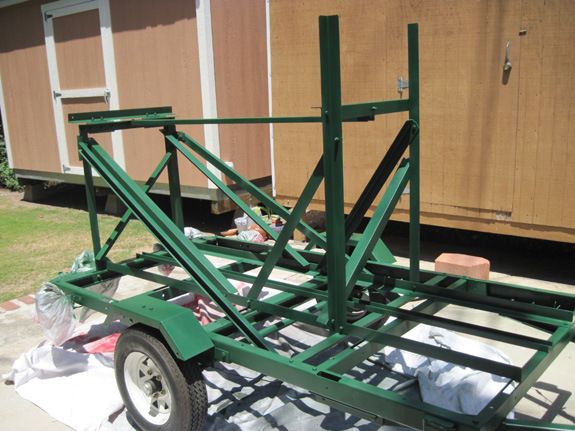
To strengthen the trailer frame before installing the tower, I added three pieces of steel running the full length of the trailer bed (8'). These three (two lengths of 2" angle stock and one 2" channel) are secured to the original frame with hardened 3/8" bolts. The superstructure, shown in the photo at left, is attached to these added steel pieces. The structure holds the tower in place 35" above the trailer frame. The tower rests in a cradle at the front and on a pair of heavy duty hinges at the rear. These hinges are secured with hardened 1/2" bolts to a large bracket that supports the weight of the tower and provides stability when the tower is upright. Before the tower is raised, a lower bracket is bolted to the trailer frame to secure the bottom of the tower. The rear of the trailer frame has two trailer jacks that fold down to allow the frame to hold the weight of the tower when it is upright without placing an additional load on the hitch, trailer tires and suspension system. With a front tongue jack in place, the tower can be raised and lowered even if no vehicle is hitched to the trailer--as long as the wheels are blocked. If a vehicle is hitched to the trailer, the receiver hitch may need a drop or a rise of 1-2" to keep the trailer level and the tower vertical when upright, depending on the hitch height of the towing vehicle. Two outriggers were added to the trailer frame to provide lateral stability when the tower is raised. As shown in the photographs, they travel on the trailer and swing outward on their hinges for use. Cables and turnbuckles secure the outriggers to the trailer.
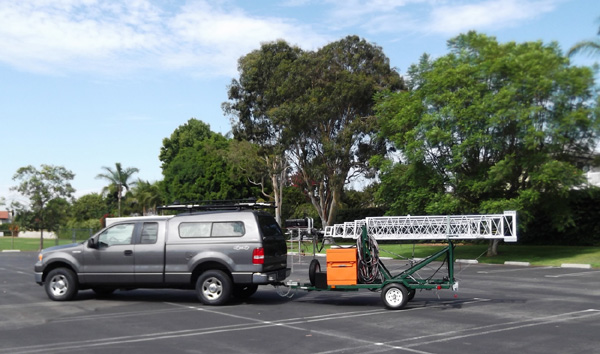
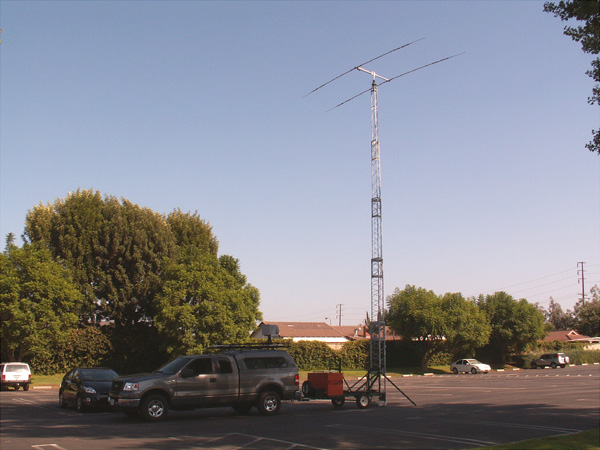
SETTING UP AND USING THE TOWER TRAILER Once the tower trailer was built and tested, various antennas were mounted on the rotator for testing. If only VHF antennas are needed, the trailer can be towed with the antennas in place, ready to go up. Of course, an HF tribander with its 30-foot wingspan is much too large for that. HF antennas such as the one shown at the end of this article must be mounted and removed at each operating site.
The typical setup involves just a few steps. First, you park in a level place and set the brake. Then you go to work on the trailer, lowering the two rear jacks and positioning the two outriggers. Next, the tower is raised to its upright position and the lower rear bracket is secured around the tower with two 1/2" bolts. Finally, the tower is elevated to its full height. This can all be done quickly enough that it's feasible for a VHF rover to get on the air in several different places in one day.
_______________________ About the author: First licensed in 1957, Wayne Overbeck has
been interested in VHF+ operating, and especially portable contesting,
for more than 55 years He won the Radio Amateur of the Year Award
at the Dayton Hamvention in 1980 as well as the ARRL Technical Excellence
Award and the John Chambers Memorial Award of the Central States VHF Society
in 1978, largely for his work on the original VHF Quagi antenna and his
early moonbounce expeditions to Alaska and the Utah-Nevada border.
He holds Ph.D. and J.D. degrees and is a retired Professor of Communications
at California State University, Fullerton.
|
 This article is about turning a utility trailer kit into a modern tower
trailer with electric winches to control all tower movements. It
is designed to get a triband HF Yagi or a multiband VHF array up about
45 feet. It can be set up in a few minutes without climbing the tower.
The tower trailer is usually configured for VHF contests with a stack
of antennas covering all bands between 50 MHz and 10 GHz. To minimize
feedline losses, the equipment for the microwave bands (including transverters
and amplifiers) is housed on a waterproof black box mounted atop the tower.
This article is about turning a utility trailer kit into a modern tower
trailer with electric winches to control all tower movements. It
is designed to get a triband HF Yagi or a multiband VHF array up about
45 feet. It can be set up in a few minutes without climbing the tower.
The tower trailer is usually configured for VHF contests with a stack
of antennas covering all bands between 50 MHz and 10 GHz. To minimize
feedline losses, the equipment for the microwave bands (including transverters
and amplifiers) is housed on a waterproof black box mounted atop the tower.
 The photographs show the basic design. The tower overhangs the rear
of the trailer by 49" to allow it to be tilted upright. Appropriate
lighting marks the tower overhang. An orange "job site box" and a
smaller tongue storage box were added to the front to balance the trailer
and provide additional tongue weight. With the boxes plus the antenna
rotator, antennas, gel cell battery, solar panel, and other equipment mounted
forward of the axle, the tongue weight is about 100 pounds.
The photographs show the basic design. The tower overhangs the rear
of the trailer by 49" to allow it to be tilted upright. Appropriate
lighting marks the tower overhang. An orange "job site box" and a
smaller tongue storage box were added to the front to balance the trailer
and provide additional tongue weight. With the boxes plus the antenna
rotator, antennas, gel cell battery, solar panel, and other equipment mounted
forward of the axle, the tongue weight is about 100 pounds.
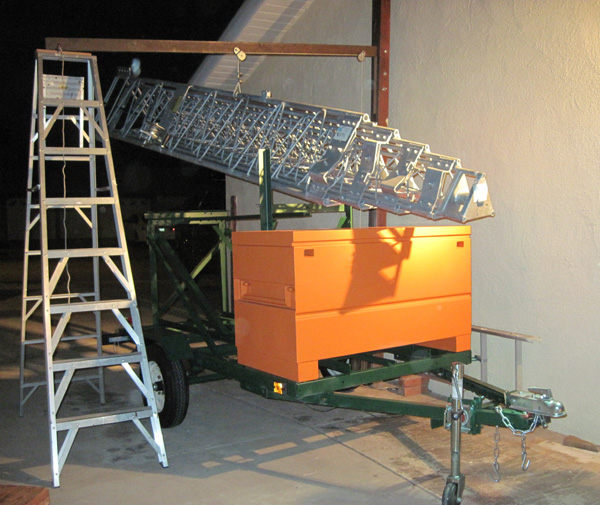 One of the more interesting aspects of this tower trailer project was hoisting
the tower onto the trailer. A hoist to lift the tower was fashioned
from 2x4s, steel channel stock and a heavy 8' ladder. Making
sure no one was underneath the tower or the hoist, I used a hand winch
to lift the tower high enough to roll the trailer under it. Then
I lowered the tower into its final position. The orange box was pre-loaded
with the equipment that it normally carries to provide sufficient tongue
weight when the tower was lowered into place. A spare tire and small
storage box were later added to the tongue for convenience and to provide
additional tongue weight when the trailer is towed without antennas and
a rotator in place on the tower.
One of the more interesting aspects of this tower trailer project was hoisting
the tower onto the trailer. A hoist to lift the tower was fashioned
from 2x4s, steel channel stock and a heavy 8' ladder. Making
sure no one was underneath the tower or the hoist, I used a hand winch
to lift the tower high enough to roll the trailer under it. Then
I lowered the tower into its final position. The orange box was pre-loaded
with the equipment that it normally carries to provide sufficient tongue
weight when the tower was lowered into place. A spare tire and small
storage box were later added to the tongue for convenience and to provide
additional tongue weight when the trailer is towed without antennas and
a rotator in place on the tower.
 Two electric winches are used to tilt the tower upright. The main
winch pulls the tower up to a point just short of vertical. At that
point, a second winch is used to restrain the tower so it doesn't crash
into the supporting frame as its center of gravity shifts. The two
winches work together to gently guide the tower to its upright position.
Once the tower is upright, a third electric winch raises the tower to its
full height. These three winches are rated at 2,000 pounds each.
Two electric winches are used to tilt the tower upright. The main
winch pulls the tower up to a point just short of vertical. At that
point, a second winch is used to restrain the tower so it doesn't crash
into the supporting frame as its center of gravity shifts. The two
winches work together to gently guide the tower to its upright position.
Once the tower is upright, a third electric winch raises the tower to its
full height. These three winches are rated at 2,000 pounds each.
 How well does this system work? Anyone who has ever operated with
low antennas surrounded by buildings and trees knows how frustrating that
can be. But with a tower trailer, it's an entirely different game.
When the tower is raised from its nested height to its full height, signals
often increase by several S-units. Even in an open field, raising
your antennas from a height of 10' or 12' up to 45' on a tower trailer
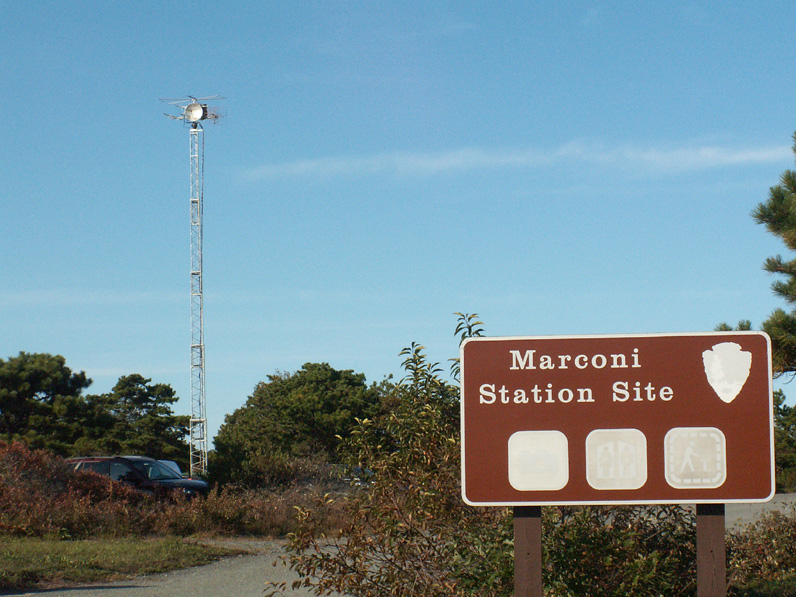
can make an amazing difference. At a place like the historic Marconi
Station Site on Cape Cod, MA (above), the difference is huge on every frequency
from the HF bands to the microwave bands. A typical HF installation
with a small tribander is shown below.
How well does this system work? Anyone who has ever operated with
low antennas surrounded by buildings and trees knows how frustrating that
can be. But with a tower trailer, it's an entirely different game.
When the tower is raised from its nested height to its full height, signals
often increase by several S-units. Even in an open field, raising
your antennas from a height of 10' or 12' up to 45' on a tower trailer
can make an amazing difference. At a place like the historic Marconi
Station Site on Cape Cod, MA (above), the difference is huge on every frequency
from the HF bands to the microwave bands. A typical HF installation
with a small tribander is shown below.
 I would like to thank Carrie Tai, W6TAI, for her help in building this
tower trailer. She did all of the painting, among other things.
In fact, it was her idea to paint a red utility trailer and the unpainted
steel superstructure the green color shown in the photos. Only she
could envision that a green trailer with a silver tower and a bright orange
storage box would look okay. Well, maybe a tower trailer does not
look okay to some motorists, but they obviously don't understand how important
it is to have a good signal on 20 meters-- or 3 centimeters.
I would like to thank Carrie Tai, W6TAI, for her help in building this
tower trailer. She did all of the painting, among other things.
In fact, it was her idea to paint a red utility trailer and the unpainted
steel superstructure the green color shown in the photos. Only she
could envision that a green trailer with a silver tower and a bright orange
storage box would look okay. Well, maybe a tower trailer does not
look okay to some motorists, but they obviously don't understand how important
it is to have a good signal on 20 meters-- or 3 centimeters.